Appwrite
What is Multitenancy?
Multitenancy refers to a kind of architecture where a single instance of software runs on a server and serves multiple customers. In a multi-tenant environment, separate customers tap into the same hardware and data storage, creating a dedicated instance for each customer. Each tenant’s data is isolated and remains invisible to others, but is running on the same server.
Introduction
In this guide, we will create an application with you in the logic of Multi Tenant(Multitenancy). We can say multi tenant application is separate and manage multiple contents independently from each other in a single application.
We will make a Cake House application using refine and Appwrite. Our Cake House will consist of two separate stores and there will be special products for these stores. We will explain step by step how to manage these stores, products, and orders separately.
This guide has been prepared to assume you know the basics of refine. If you haven't learned these basics yet, we recommend reading the Tutorial.
Setup
npm install @refinedev/appwrite
To make this example more visual, we used the @refinedev/antd package. If you are using Refine headless, you need to provide the components, hooks, or helpers imported from the @refinedev/antd package.
Usage
import { Refine } from "@refinedev/core";
import {
    ThemedLayoutV2,
    notificationProvider,
    ErrorComponent,
    RefineThemes,
} from "@refinedev/antd";
import { dataProvider } from "@refinedev/appwrite";
import routerProvider from "@refinedev/react-router-v6";

import { BrowserRouter, Routes, Route, Outlet } from "react-router-dom";

import { ConfigProvider } from "antd";
import "@refinedev/antd/dist/reset.css";

import { appwriteClient } from "utility";
import { authProvider } from "./authProvider";

const App: React.FC = () => {
    return (
        <BrowserRouter>
            <ConfigProvider theme={RefineThemes.Blue}>
                <Refine
                    dataProvider={dataProvider(appwriteClient)}
                    authProvider={authProvider}
                    routerProvider={routerProvider}
                    notificationProvider={notificationProvider}
                >
                    <ThemedLayoutV2>{/* ... */}</ThemedLayoutV2>
                </Refine>
            </ConfigProvider>
        </BrowserRouter>
    );
};
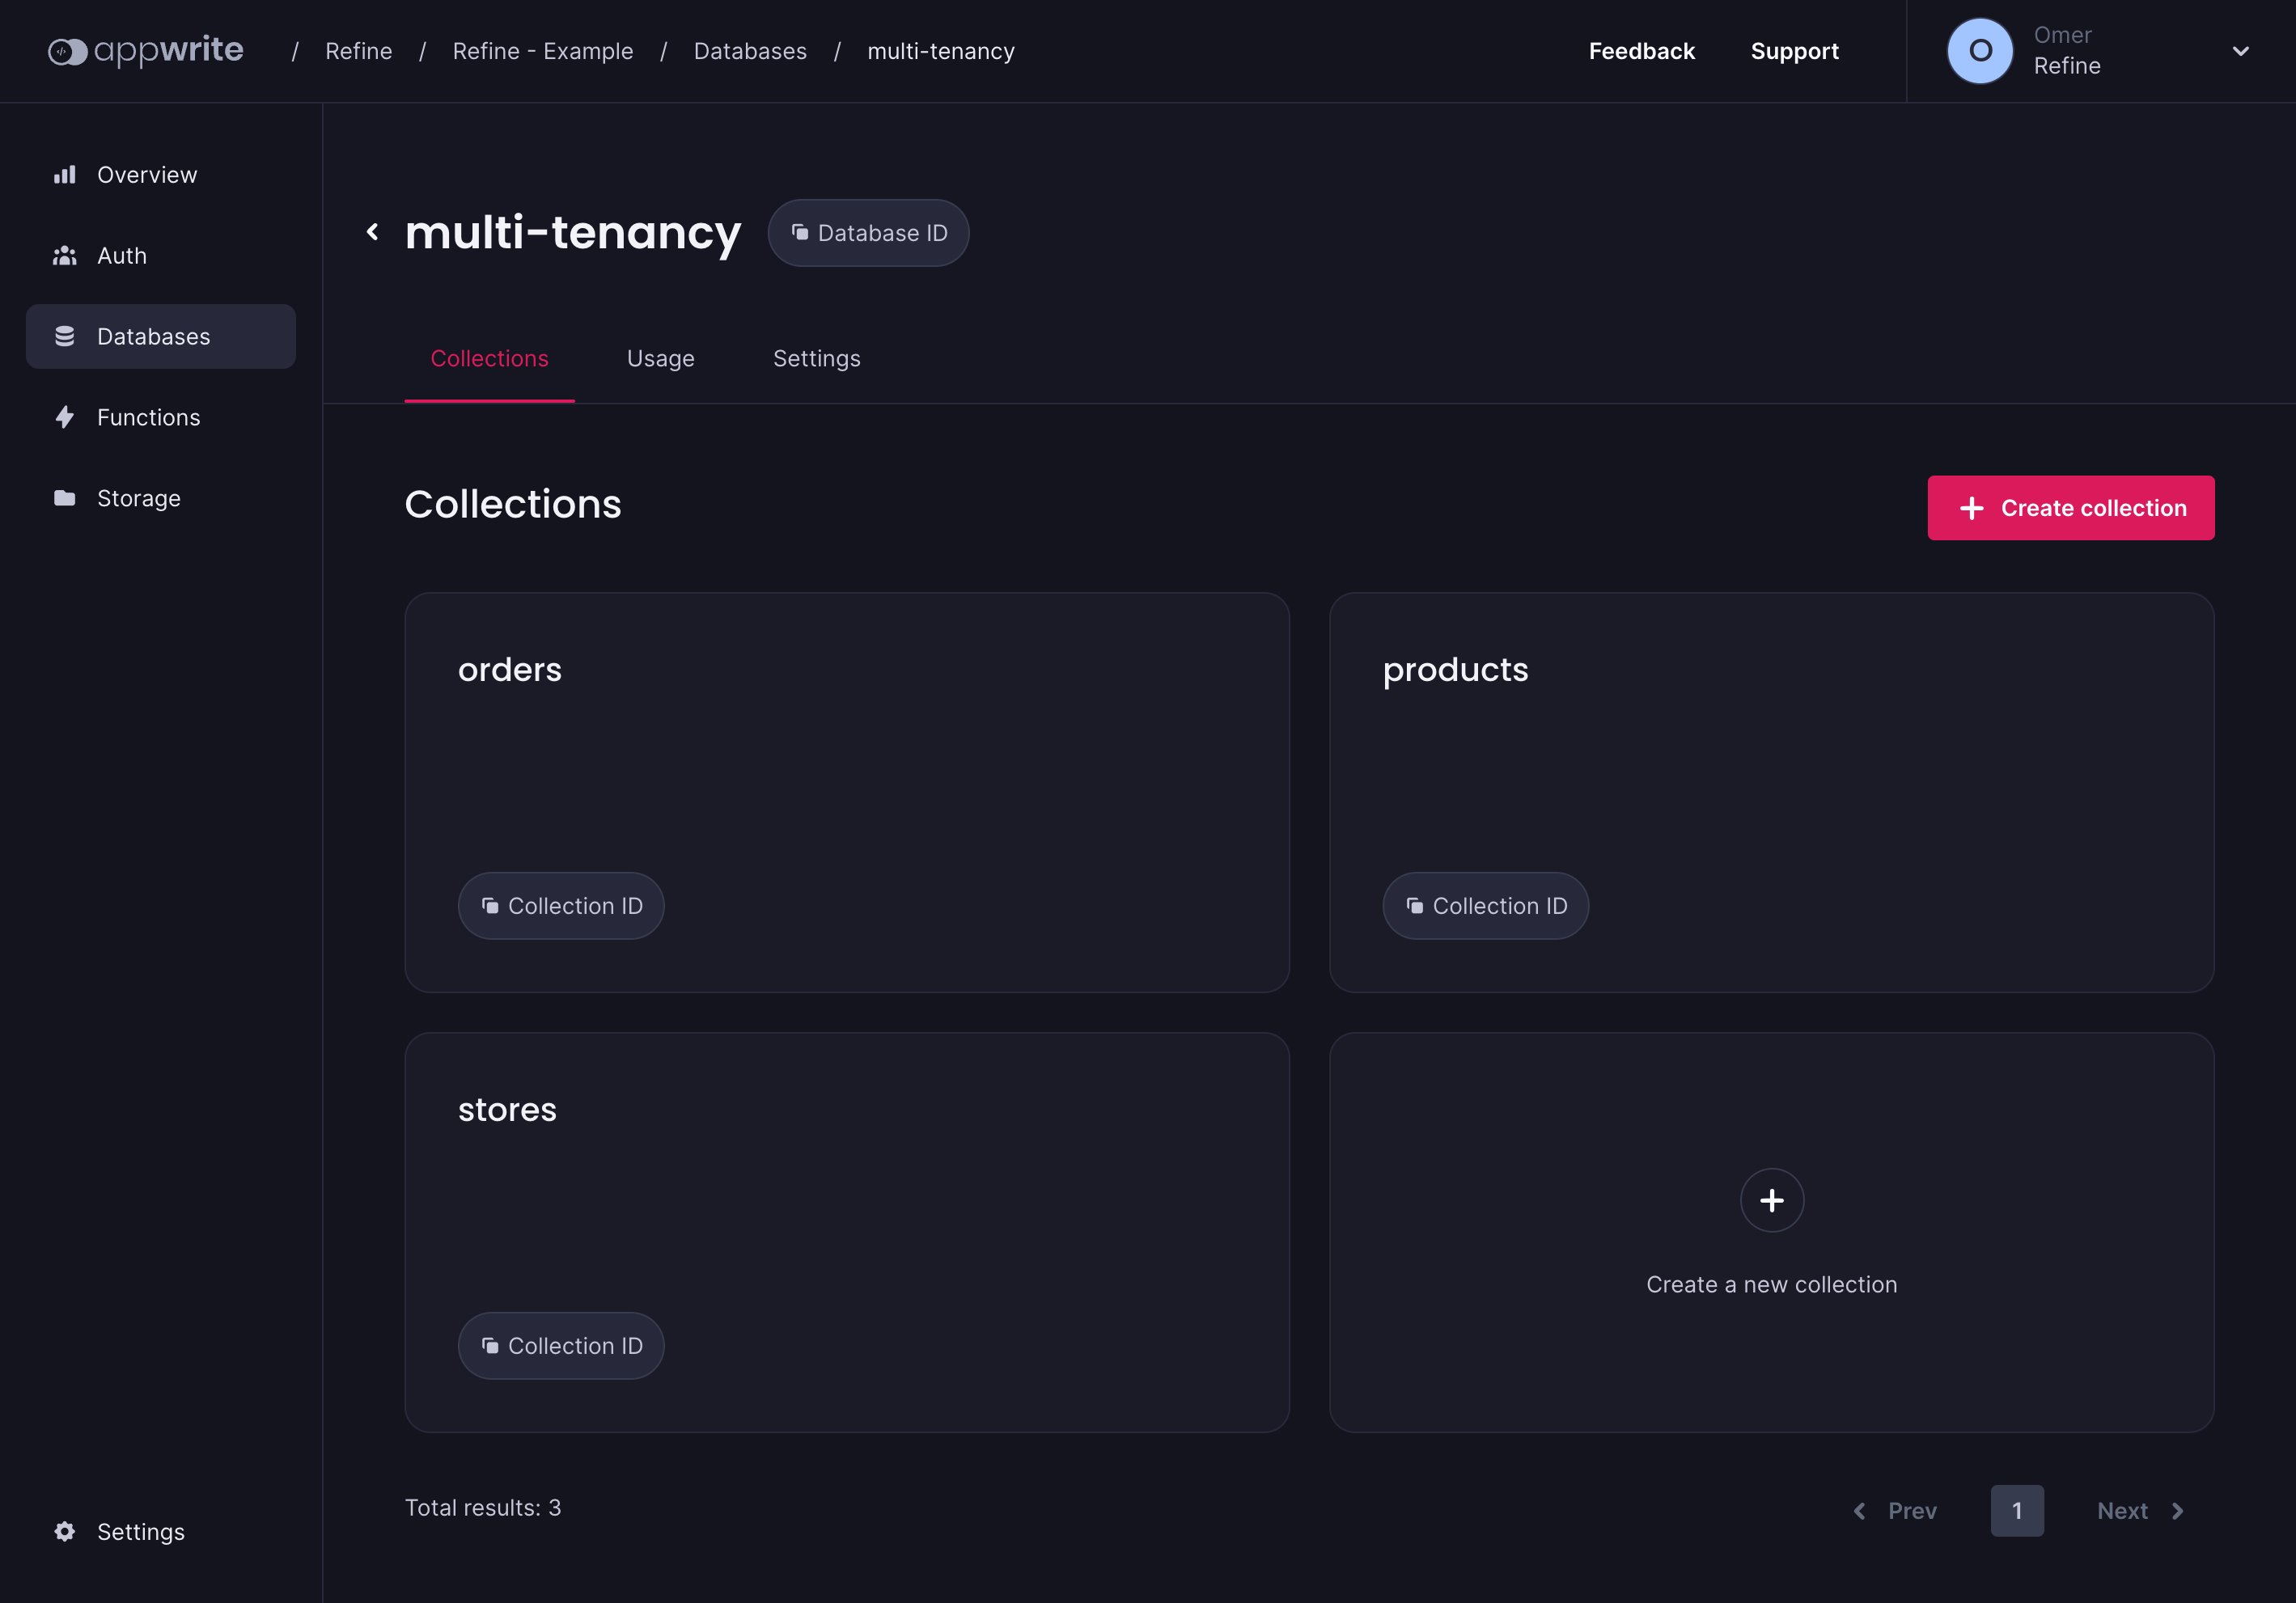
Create Collections
We need three collections for our Cake House application. Let's create these collections in the appwrite database.
stores
- title: text
products
- title: text
- description: text
- image: text
- storeId: text
orders
- productId: text
- customerName: text
- customerAddress: text
- status: text
- quantity: numeric
- storeId: text
Now that we have completed the setup and our collections, we can now log in with the refine and start the listing processes.
Create Resources and Routes
To view the products and orders of two different stores separately, we need to filter by storeId. We will use the storeId information in more than one place. For example, when creating a store-specific order. We will also add this as a prefix to the routes. (example.com/:tenant/products)
function App() {
    // When `domain.com` is entered, we set the default tenant to redirect `domain.com/name`.
    const tenant = "refine";

    return (
        <BrowserRouter>
            <GitHubBanner />
            <ConfigProvider theme={RefineThemes.Blue}>
                <Refine
                    routerProvider={routerProvider}
                    liveProvider={liveProvider(appwriteClient, {
                        databaseId: "multi-tenancy",
                    })}
                    dataProvider={dataProvider(appwriteClient, {
                        databaseId: "multi-tenancy",
                    })}
                    authProvider={authProvider}
                    options={{
                        liveMode: "auto",
                        syncWithLocation: true,
                        warnWhenUnsavedChanges: true,
                    }}
                    // The path definition for `list`, `create`, `show`, `edit` pages is as follows and variables can be used as in `react-router`.
                    resources={[
                        {
                            name: "products",
                            list: "/:tenant/products",
                            show: "/:tenant/products/show/:id",
                            // Compose with the `meta` object.
                            meta: {
                                tenant,
                            },
                        },
                        {
                            name: "orders",
                            list: "/:tenant/orders",
                            create: "/:tenant/orders/create",
                            edit: "/:tenant/orders/edit/:id",
                            meta: {
                                tenant,
                            },
                        },
                    ]}
                    notificationProvider={notificationProvider}
                >
                    <Routes>
                        {/* ... */}
                        <Route
                            index
                            element={
                                <NavigateToResource resource="products" />
                            }
                        />

                        {/* prefix `resources` paths. */}
                        <Route path="/:tenant">
                            <Route path="products">
                                <Route index element={<ProductList />} />
                                <Route
                                    path="show/:id"
                                    element={<ProductShow />}
                                />
                            </Route>

                            <Route path="orders">
                                <Route index element={<OrderList />} />
                                <Route
                                    path="create"
                                    element={<OrderCreate />}
                                />
                                <Route
                                    path="edit/:id"
                                    element={<OrderEdit />}
                                />
                            </Route>
                        </Route>
                    </Routes>
                    <UnsavedChangesNotifier />
                </Refine>
            </ConfigProvider>
        </BrowserRouter>
    );
}
Using the tenant at the other components
You may want to get the tenant within the project. This is easily get with the useParsed hook.
import { useParsed } from "@refinedev/core";

const { params } = useParsed<{ tenant: string }>();

console.log(params?.tenant); // { tenant: "refine" }
Shop Select to Sider Component
We will create a select component in the Header where the user will select the stores. Let's create our select component first, then let's see how we can define it in the refine Header component.
import { useSelect } from "@refinedev/antd";
import { useGetToPath, useGo, useParsed } from "@refinedev/core";
import { Select } from "antd";

import { IStore } from "interfaces";

export const StoreSelect: React.FC = () => {
    const getToPath = useGetToPath();
    const go = useGo();
    const { resource, action, params } = useParsed<{ tenant: string }>();

    const { selectProps: storeSelectProps } = useSelect<IStore>({
        resource: "stores",
        optionLabel: "title",
        optionValue: "id",
    });

    return (
        <Select
            defaultValue={params?.tenant}
            style={{ width: 120 }}
            onChange={(tenant) =>
                go({
                    to: getToPath({
                        resource,
                        action: action || "list",
                        meta: {
                            tenant,
                        },
                    }),
                })
            }
            onSelect={() => false}
        >
            {storeSelectProps.options?.map(({ value, label }) => (
                <Select.Option key={value} value={value}>
                    {label}
                </Select.Option>
            ))}
        </Select>
    );
};
Here we have created a select component. Then we fetch the store id and title we created in the Appwrite database with useSelect.
Let's define the select component in the refine Header.
Check out how you can customize Header →
Show Code
import React from "react";
import { Layout as AntdLayout, Typography, Avatar, Space, theme } from "antd";
import { useActiveAuthProvider, useGetIdentity } from "@refinedev/core";
import { RefineThemedLayoutV2HeaderProps } from "@refinedev/antd";
import { StoreSelect } from "../select";

const { Text } = Typography;
const { useToken } = theme;

export const Header: React.FC<RefineThemedLayoutV2HeaderProps> = () => {
    const { token } = useToken();

    const authProvider = useActiveAuthProvider();
    const { data: user } = useGetIdentity({
        v3LegacyAuthProviderCompatible: Boolean(authProvider?.isLegacy),
    });

    const shouldRenderHeader = user && (user.name || user.avatar);

    if (!shouldRenderHeader) {
        return null;
    }

    return (
        <AntdLayout.Header
            style={{
                backgroundColor: token.colorBgElevated,
                display: "flex",
                justifyContent: "flex-end",
                alignItems: "center",
                padding: "0px 24px",
                height: "64px",
                position: "sticky",
                top: 0,
                zIndex: 1,
            }}
        >
            <Space
                style={{
                    width: "100%",
                    display: "flex",
                    justifyContent: "space-between",
                }}
            >
                <StoreSelect />
                <Space size="middle">
                    {user?.name && <Text strong>{user.name}</Text>}
                    {user?.avatar && (
                        <Avatar src={user?.avatar} alt={user?.name} />
                    )}
                </Space>
            </Space>
        </AntdLayout.Header>
    );
};
 |
|---|
As you can see, you can create a store-specific product and order by selecting tenant in the Header component and choosing according to the storeId information. |
Product List Page
Now we can list the products of the selected store according to the storeId information by filtering it. We can do this filtering by using the filters.permanent property within the refine's useSimpleList hook.
We separate the products of different stores by using the filters.permanent with the storeId we get from the Store Context. So we can control more than single content in one application.
import { useParsed } from "@refinedev/core";

const { params } = useParsed<{ tenant?: string }>();

const { listProps } = useSimpleList<IProduct>({
    filters: {
        permanent: [{ field: "storeId", operator: "eq", value: params?.tenant }],
    },
});
Show Code
import {
    IResourceComponentsProps,
    HttpError,
    useParsed,
} from "@refinedev/core";

import {
    useSimpleList,
    useModalForm,
    CreateButton,
    List,
} from "@refinedev/antd";
import { List as AntdList } from "antd";

import { IProduct } from "interfaces";
import { ProductItem, EditProduct, CreateProduct } from "components/product";

export const ProductList: React.FC<IResourceComponentsProps> = () => {
    const { params } = useParsed<{ tenant?: string }>();
    const { listProps } = useSimpleList<IProduct>({
        filters: {
            permanent: [
                {
                    field: "storeId",
                    operator: "eq",
                    value: params?.tenant,
                },
            ],
        },
    });

    const {
        modalProps: createModalProps,
        formProps: createFormProps,
        show: createShow,
    } = useModalForm<IProduct, HttpError, IProduct>({
        resource: "products",
        action: "create",
        redirect: false,
    });

    const {
        modalProps: editModalProps,
        formProps: editFormProps,
        show: editShow,
    } = useModalForm<IProduct, HttpError>({
        action: "edit",
        queryOptions: {
            select: ({ data }) => {
                return {
                    data: {
                        ...data,
                        image: data.image ? JSON.parse(data.image) : undefined,
                    },
                };
            },
        },
    });

    return (
        <>
            <List
                headerProps={{
                    extra: <CreateButton onClick={() => createShow()} />,
                }}
            >
                <AntdList
                    grid={{ gutter: 16, xs: 1 }}
                    style={{
                        justifyContent: "center",
                    }}
                    {...listProps}
                    renderItem={(item) => (
                        <AntdList.Item>
                            <ProductItem item={item} editShow={editShow} />
                        </AntdList.Item>
                    )}
                />
            </List>
            <EditProduct
                modalProps={editModalProps}
                formProps={editFormProps}
            />
            <CreateProduct
                modalProps={createModalProps}
                formProps={createFormProps}
            />
        </>
    );
};
In this example, we used the filter.permanent object to filter the data, as Appwrite does not support multitenancy. However, you can do this from a single point by swizzle the data provider in your own RestApi.
You can check out the swizzle data provider guide for more information.
The resource.meta object is passed as meta to all methods in the data providers. For this you have to swizzle the data provider.
//...
export const dataProvider = (): Required<DataProvider> => {
    //...
    return {
        getList: async ({ resource, pagination, filters, sorters, meta }) => {
            // ...
            console.log(meta.tenant); // { tenant: "refine" }
        },
        getOne: async ({ resource, id, meta }) => {
            // ...
            console.log(meta.tenant); // { tenant: "refine" }
        }
        // ...
    }
}
Product Create Page
Now let's see how we can create store-specific products. Which store we choose in Sider, the product we will create will automatically be the product of the selected store.
By overriding the onFinish method of the form and sending the selected storeId, we specify which store it will be the product of.
import { useParsed } from "@refinedev/core";
const { params } = useParsed<{ tenant?: string }>();

<Form
    {...formProps}
    ...
    onFinish={(values) => {
        return (
            formProps.onFinish?.({
                ...values,
                storeId: params?.tenant,
            })
        );
    }}
>
...
Show Code
import { Form, FormProps, Input, Upload, ModalProps, Modal } from "antd";
import { Permission, Role } from "@refinedev/appwrite";
import { useParsed } from "@refinedev/core";
import { RcFile } from "antd/lib/upload/interface";
import { normalizeFile, storage } from "utility";
type CreateProductProps = {
modalProps: ModalProps;
formProps: FormProps;
};
export const CreateProduct: React.FC<CreateProductProps> = ({
modalProps,
formProps,
}) => {
const { params } = useParsed<{ tenant?: string }>();
return (
<Modal {...modalProps}>
<Form
{...formProps}
layout="vertical"
initialValues={{
isActive: true,
}}
onFinish={(values) =>
formProps.onFinish?.({
...values,
storeId: params?.tenant,
image: JSON.stringify(values.image),
})
}
>
<Form.Item
label="Title"
name="title"
rules={[
{
required: true,
},
]}
>
<Input />
</Form.Item>
<Form.Item label="Description" name="description">
<Input />
</Form.Item>
<Form.Item label="Images">
<Form.Item
name="image"
valuePropName="fileList"
normalize={normalizeFile}
noStyle
>
<Upload.Dragger
name="file"
listType="picture"
multiple
customRequest={async ({
file,
onError,
onSuccess,
}) => {
try {
const rcFile = file as RcFile;
const { $id } = await storage.createFile(
"default",
rcFile.name,
rcFile,
[Permission.read(Role.any())],
);
const url = storage.getFileView(
"default",
$id,
);
onSuccess?.({ url }, new XMLHttpRequest());
} catch (error) {
onError?.(new Error("Upload Error"));
}
}}
>
<p className="ant-upload-text">
Drag & drop a file in this area
</p>
</Upload.Dragger>
</Form.Item>
</Form.Item>
</Form>
</Modal>
);
};
Bonus - Realtime Feature
refine lets you add Realtime support to your app via liveProvider prop for <Refine>. It can be used to update and show data in Realtime throughout your app. refine remains agnostic in its API to allow different solutions(Ably, Socket.IO, Mercure, supabase, etc.) to be integrated.
Refer to the Live Provider documentation for detailed information. →
Appwrite Realtime API support is out-of-the-box supported by refine, just add two lines to make your App Realtime.
import { Refine, Authenticated } from "@refinedev/core";
import {
    ThemedLayoutV2,
    notificationProvider,
    ErrorComponent,
    RefineThemes,
} from "@refinedev/antd";
import { dataProvider, liveProvider } from "@refinedev/appwrite";
import routerProvider, {
    CatchAllNavigate,
    NavigateToResource,
} from "@refinedev/react-router-v6";

import { BrowserRouter, Routes, Route, Outlet } from "react-router-dom";

import { ConfigProvider } from "antd";
import "@refinedev/antd/dist/reset.css";

import { appwriteClient } from "utility";
import { authProvider } from "./authProvider";

import { CustomSider } from "components/sider";
import { Login } from "pages/login";
import { ProductList } from "pages/products";
import { ProductShow } from "components/product";
import { StoreProvider } from "context/store";

function App() {
    return (
        <StoreProvider>
            <BrowserRouter>
                <ConfigProvider theme={RefineThemes.Blue}>
                    <Refine
                        routerProvider={routerProvider}
                        liveProvider={liveProvider(appwriteClient)}
                        options={{ liveMode: "auto" }}
                        dataProvider={dataProvider(appwriteClient)}
                        authProvider={authProvider}
                        notificationProvider={notificationProvider}
                        resources={[
                            {
                                name: "61cb01b17ef57",
                                list: "/products",
                                show: "/products/show:id",
                                meta: {
                                    label: "Products",
                                },
                            },
                        ]}
                    >
                        <Routes>
                            <Route
                                element={
                                    <Authenticated
                                        fallback={
                                            <CatchAllNavigate to="/login" />
                                        }
                                    >
                                        <ThemedLayoutV2 Sider={CustomSider}>
                                            <Outlet />
                                        </ThemedLayoutV2>
                                    </Authenticated>
                                }
                            >
                                <Route path="products">
                                    <Route index element={<ProductList />} />
                                    <Route
                                        path="show:id"
                                        element={<ProductShow />}
                                    />
                                </Route>
                            </Route>
                            <Route
                                element={
                                    <Authenticated fallback={<Outlet />}>
                                        <NavigateToResource />
                                    </Authenticated>
                                }
                            >
                                <Route path="/login" element={<Login />} />
                            </Route>
                            <Route path="*" element={<ErrorComponent />} />
                        </Routes>
                    </Refine>
                </ConfigProvider>
            </BrowserRouter>
        </StoreProvider>
    );
}

export default App;
Conclusion
In this guide and in our example app, we talked about how we can build multitenancy apps with refine. Developing a multitenancy application is quite simple with the flexible route infrastructure of refine.
Example
npm create refine-app@latest -- --example multi-tenancy-appwrite